Showing posts with label Tips n Tricks. Show all posts

23 September 2010

Gmail...

Bagi yang ada akaun Gmail, korang perasan tak yang Gmail sekarang banyak feature baru. Kat sini aku nak cerita pasal salah satu feature yang menarik iaitu themes.

Tengok aku punya akaun, bila dah tukar theme, cantik tak?


Camana nak buat? Korang klik setting tu, pastu select Themes macam kat bawah ni...


Bila dah klik tu, akan keluarlah list themes, So, korang bolehlah pilih themes mana yang korang berkenan. Kalau nak selalu berubah, select Random je, nanti akan berubah-ubah setiap kali korang login ke email.


Selamat mencuba!


Share/Bookmark


Nak duit lebih? Jom jana pendapatan. KLIK SINI

30 March 2010

Tutorial: ESET NOD32 ID & Password update

Hari ni aku nak kasik tutorial sikit pasal nak update ID ngan password antivirus ESET NOD32. Ramai geng-geng aku pakai ESET NOD32 sebab aku yang tolong install dan bagitau diorang kalau nak update ID ngan password, link ada aku letakkan kat blog aku ni. Tapi masalah timbul bila antivirus ESET NOD32 ini sendiri yang block bila nak access ke link tu so, bagi yang noob memang tak tau nak buat apa... Haha! Padan muka! Reti pakai je tak reti nak explore.

Aku taknak membebel, cuma aku nak bagitau cara nak access ke link/site tu dan update ESET NOD32 ID dan password. Mudah saja, ikut step kat bawah ni:

1. Korang boleh tengok kat bahagian FAVOURITE LINK aku ada link ESET NOD32. Korang boleh klik kat situ.


2. Bila dah klik, mungkin korang akan face problem takleh nak access sebab kena blok ngan antivirus. Jangan panik, mudah je...


3. OK, bila dah dapat mesej macam kat atas ni, korang open antivirus dan ikut step nombor dalam gambar bawah ni. Disable antivirus untuk sementara waktu sementara korang nak masuk ke website tu untuk dapatkan ID dan password baru.


4. Bila korang dah klik untuk disable tu, popup akan keluar, tekan YES je....

5. Ada 1 cara lagi yang korang boleh buat kalau taknak disable antivirus. korang bukak antivirus, tekan F5 dan ikut step nombor pada gambar kat bawah ni.


6. Bila dah tekan button ADD tu, popup akan keluar dan korang isi ni: eset-nod32-free.blogspot.com dan address tu akan masuk ke kotak. Tekan OK. Dah pun siap. So, next time tak perlu lagi nak disable dan enable.


7. Haa..... dah boleh access pun... So, kat website ni listing banyak ID dan password yang korang boleh pilih mana yang korang nak...


8. Dah pilih tu, korang copy satu-satu. ID dulu dan kemudian password dan masukkan ke tempat seperti dalam gambar kat bawah ni


9. Dah pun siap... Cubalah update dulu sebelum tutup antivirus tu kot-kot ID dan password yang korang pilih tu dah expired. Kalau dah expired, ulang step 8 sampai dapat update. ID dan password kat site ni dikeluarkan pada setiap hari. Jadi kalau antivirus korang expired, masuk je ke site ni dan update.


Selamat mencuba! Selamat berjaya!


Share/Bookmark


Nak duit lebih? Jom jana pendapatan. KLIK SINI

10 October 2009

Cara auto-update blog posting di Yahoo! Messenger

Nih ada trick baru mempromosikan blog atau posting blog yang korang dah update melalui YM. Kalau korang tengok status YM aku, mesti korang nampak list posting aku kat bawah macam kat gambar bawah ni... So, dengan ni, korang tak payahlah nak melalak kat sbox blog orang lain bagitau yang korang dah update blog haha!!!...


Caranya mudah saja.... Dengan hanya beberapa step, dah boleh siap. Ikut je cara kat bawah ni.

Langkah pertama: Bukak windows YM, pergi kat menu Messenger >> My Account Info macam kat gambar bawah ni. Klik situ.


Langkah kedua: Lepas korang klik situ, browser akan bukak page Yahoo! Login je kat page tu guna ID dan password korang.


Langkah ketiga: Lepas login tu, korang klik kat tab My Profile.


Langkah keempat: Kalau korang tak nampak icon blogger/blogspot, korang klik kat more.


Langkah kelima: Bila dah klik more tu, carik icon blogger dan add je la URL blog korang. pastu bila dah siap, korang logout YM dan login balik....


Itu saje... Cubalah.....

P/S: Korang jangan tanya aku camana aku boleh nampak ID aku masa aku online YM. Aku pun tak sure camana, sejak dulu memang muncul ID aku sendiri time aku online. Tapi korang boleh cuba, add ID sendiri kot.....


Share/Bookmark


Nak duit lebih? Jom jana pendapatan. KLIK SINI

04 October 2009

Tutorial: Scroll to Top Control Function

If you scroll my blog to bottom, you will see an arrow as pictures, its function as short-cut to go up immediately since this blog has a long page and takes more time to scroll up by using your mouse. So, I added this function to easier the visitor who visited my blog to go back to top in just a single click.


If you are interested to add too, follow this tutorial step by step. All you need to have:
1. Hosting (free or paid)
2. Javascript
3. Arrow image

Hosting.
If you already have your own hosting, please ignore this step. For those who don't have any hosting, please register to one of the hosting provider. I give one hosting which provide a free service. Go to http://members.webs.com and sign-up for your own account. Requirement 1 clear!

Javascript
This function use Javascript. Get a Javascript here. Download it (right click, and select "Save As"). Step 2 Clear!

Arrow Image
You may get your own arrow image but I give you a sample and if you like to use this arrow, Download it (right click, and select "Save As"). Step 3 Clear!
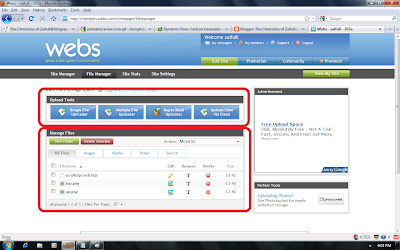


The Steps.
1. Login to your hosting provider account.


2. Go to your file manager, upload the Javascript and arrow image.


3. OK done! Now go to your Blogger Dashboard. Open your layout and click at EDIT HTML. Find the word and add this javascript code below it:


4. Now, the tricky time. Did you see the word scrolltopcontrol.js in the code? What you have to do now is, replace the code by using your own Javascript URL for example:


5. Don't forget to save it. Now, go back to your hosting provider. Check the URL for your image. Copy the URL to somewhere else.

6. Now, click EDIT on your Javascript file. Find the words as per picture below.


Did you see the word "up.png"? Replace with your image URL. For example:

You can adjust the required image size by editing the width and height.

7. Save and done. Now refresh your blog, You will the effect.

Happy trying! Good Luck


Share/Bookmark


Nak duit lebih? Jom jana pendapatan. KLIK SINI

27 September 2009

Changes of domain URL

Yes, finally I've successfully added a new free domain... Looks nice and better LOL!!
So, If you want to follow me, just follow this TUTORIAL

My new URL now is http://zaifull.via.my
Please update your blog list or what so ever!!!

Please bear in mind, you should re-edit/redo/reinstate some widget/adsense/counter after changing your blog domain URL


Credit to TEWE


Share/Bookmark


Nak duit lebih? Jom jana pendapatan. KLIK SINI

03 September 2009

LinkWithin

Makcik Boo tanya pasal nak buat LinkWithin macam aku punya


Tak susah pun, masuk sini dan isi camana rupa ko nak samada 3 stories ke, 4 stories ke, 5 stories ke... Tengoklah saiz posting body blog korang la... Pastu tekan je la button get widget tu... Itu saje.


Share/Bookmark


Nak duit lebih? Jom jana pendapatan. KLIK SINI

01 September 2009

Log in to Yahoo! Messenger with multi account within the same time

yahoo I have good news for those who like chatting by using Yahoo! Messenger. We usually have more than one account (including Kang Rohman). In default, if we log in to Yahoo! Messenger on our computer, we cannot log in again with another account. If we try to log in with another account, automatically, the previously logged-in-account will be logged out, in other words, we can only log in with one account.

Is there a way to be able to log in with multi account within the same time? Well, actually there is the way to log in with multiple accounts in the same time. Want to know? Below are the steps (for Windows XP)

  1. Click Start on your computer
  2. Click Run…
  3. Write : regedit
  4. Click OK
  5. When window registry editor open, find HKEY_CURRENT_USER
  6. Open this: HKEY_CURRENT_USER Software Yahoo ⇒ Pager Test.
  7. Right click at the folder Test ⇒ New ⇒ DWORD Value

    DWORD

  8. Rename the New Value #1 becomes : Plural
  9. Right click at Plural Modify

    modify

  10. Change Value Data becomes 1, Base choose at decimal. Click OK

    plural

  11. Close your Window Registry editor

  12. Done

Now try to log in to your Yahoo! Messenger, and then try again with another account. You should have been able to log in to YM with multi accounts in the same time if succeed.


So, I've tried and my YM now is doubled, I can login more than 1 account now!


Share/Bookmark


Nak duit lebih? Jom jana pendapatan. KLIK SINI

previous home
Related Posts with Thumbnails